Monday, September 28, 2020

Office 365 Federation with Workspace One Access for Single Sign On and Conditional Access

*Attention* - Federating a on-premises domain with WorkspaceOne Access affects all of the domain users' authentication with Office365. It is highly recommended to perform this procedure using a test domain and test Office365 tenant first.  

Federating Office 365 with Workspace One Access provides several benefits:

  • Users can access their Office 365 applications directly from the Intelligent Hub catalog using Single Sign On (SSO)
  • Conditional access policies can be created in Workspace One Access to validate whether a user can access their Office 365 applications or not based on device type, IP address range, whether the device is being managed by Workspace One UEM, whether the device is compromised etc..
  • Besides providing single sign on capability with Browser access, with Workspace ONE UEM managing the devices mobile SSO policies can be used to provide SSO to the Office 365 native mobile apps in IOS and Android devices
Today's post illustrates how I federated my Office 365 domain with my Workspace One Access tenant.

Office 365 can be integrated with Workspace One Access when Office 365 is federated with the on-premises domain


These were the components required in order to set up this integration:
  • A publicly registered domain 
  • A Workspace One Access tenant
  • A Workspace One UEM tenant 
  • A Windows on-premises Active Directory domain already integrated with the WorkspaceOne Access tenant
  • An Office 365 subscription
  • A public CA issued certificate
Before starting with the actual integration I had to work on a fix for a situation with my on-premises active directory domain, which has a non-routable domain suffix, .local, and as such would not be able to connect to Azure. I had to add a routable suffix to my domain before proceeding. This Microsoft article explains how to accomplish this: Article


The next step was to federate my on-premises domain with Azure AD in order for my on-premises domain users to be entitled to O365 licenses. This step required the installation and configuration of Active Directory Federation Services (ADFS) in my on-premises domain. The ADFS endpoint requires a public issued CA certificate. I used letsencrypt.org to create the certificate for my domain but any public CA would work as well. I will publish a post later one with instructions on how to use letsencrypt.org to create certificated for lab scenarios.

ADFS is a Windows Server role that can be installed using Server Manager.


After installing the ADFS role I also added two powershell modules into the ADFS server:
  • Install-Module -Name AzureAD 
  • Install-Module -Name MSOnline

 Then I used the following powershell commands to ensure the modules were installed:

  • Get-Module -ListAvailable |findstr MSOnline
  • Get-Module -ListAvailable |findstr AzureAD 

Before proceeding with the AzureAD configuration first I downloaded, installed and executed the Microsoft IDfix tool. This tool shows any possible synchronization issue with AzureAD. It is useful to run it and remediate the synchronization issues before configuring your AzureAD federation. The IDfix tool can be downloaded using the following link: Link


Once I executed the IDfix tool and fixed all possible synchronization issues with my on-premises domain user accounts I installed the AzureAD connect tool to synchronize my on-premises user accounts with AzureAD. The AzureAD connect tool can be downloaded using this link: Link

Once the Azure AD Connect tool is installed in the local ADFS server the tool will periodically synchronize the on-premises domain with AzureAD. 


Once I finished setting up my Azure AD connect and federating my on-premises domain to AzureAD I went to my Azure portal and verified my on-premises domain status in Azure Active Directory \ Azure AD Connect and in Azure Active Directory \ Azure AD Connect \ Federation


At this point my lab on-premises domain was ready to be federated with my WorkspaceOne Access tenant. In order to do so I used this command on my ADFS server:
  • set-MsolDomainDomainAuthentication 
This command requires several attributes, some from the on-premises Active Directory domain and some from the WorkspaceOne Access tenant. This is how the command was customized for my lab:
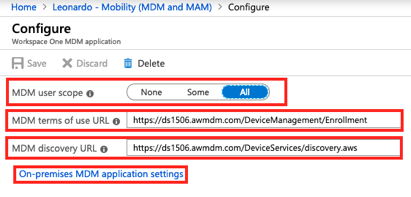
  • set-MsolDomainAuthentication –DomainName lvalente.com –Authentication Federated –IssuerUri td-valentel.vidmpreview.com -FederationBrandName lvalenteInc -PassiveLogOnUri https://td-valentel.vidmpreview.com/SAAS/API/1.0/POST/sso -LogOffUri https://login.microsoftonline.com/logout.srf -ActiveLogOnUri https://td-valentel.vidmpreview.com/SAAS/auth/wsfed/active/logon -MetadataExchangeUri https://td-valentel.vidmpreview.com/SAAS/auth/wsfed/services/mex -SigningCertificate <WS1 Access Tenant Certificate>
In order to issue the command I needed my WS1 Access Tenant certificate. I was able to retrieve this certificate my logging in my WS1 Access Admin Console. This certificate is located in Catalog \ Web Apps \ Settings \ SAML Metadata


Once I executed the above command successfully I used the following command to confirm my on-premises domain was now federated to my WorkspaceOne Access tenant:
  • Connect-MsolService
  • Get-MsolDomain

Next I had to confirm I was synching the necessary attributes required by for Office 365 SSO SAML assertion between my on-premises domain and my WorkspaceOne Access tenant. Reminding here that the pre-reqs listed at the beginning of this article included the integration between the on-premises AD domain and the WorkspaceOne Access tenant using the WorkspaceOne Access Connector was a pre-req for this exercise.

In order for the SAML communication between WorkspaceOne Access and Office 365 to succeed the following domain attributes are required to be mapped.
  • ObjectGUID
  • UserPrincipalName
I did not have the ObjectGUID attribute mapped in my WorkspaceOne Access initially. I added it in WorkspaceOne Access in Identity & Access Management \ Setup \ User Attributes


I then made sure the two attributes were correctly mapped to domain values in Identity & Access Management \ Manage \ Directories \ Sync Settings \ Mapped Attributes


I was getting close now. The last step before testing was to set up the O365 App in WorkspaceOne Access and entitle it to my users

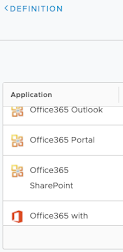
I went into my WorkspaceOnce Access tenant admin console and selected Catalog \ Web Apps \ New and then clicked on or browse from catalog and finally typed Office365 to filter the list of available apps and picked Office365 Portal. 


When setting up the App I had to make sure that:
  • the tenant attribute was mapped to my on-premises AD domain routable suffix 
  • that the issuer attribute was mapped to my WorkspaceOne Access tenant URL 
  • that in Advanced Properties the UPN attribute was mapped to the variable ${user.userPrincipalName}
  • and that the ImmutableID attribute was mapped to the variable ${user.objectGUID}


And that was that! At this point all I had to do was to test and make sure SSO was working properly while initiated either from the IDP - WorkspaceOne Access or from the SP - Office 365. This was the result:


Now that I have my Office 365 tenant properly federated to my WorkspaceOne Access tenant I can setup Authentication policies in WorkspaceOne Access to for example just authorize access to Office 365 from devices enrolled in WorkspaceOne UEM and I can set up compliance policies in WorkspaceOne UEM blocking access to Office 365 to devices that fail my compliance policies. 

This document helped me tremendously with this integration: Article

Happy testing!


Tuesday, September 22, 2020

Deploying Horizon Cloud on Azure without connecting to a on-prem AD domain

Today's post illustrates how I set up a Horizon Cloud environment within Azure.

There are several articles illustrating Horizon Cloud on Azure pre-reqs and deployment. For example there is this great TechZone article with Step by Step actions to deploy Horizon Cloud on Azure: Article

This post however focuses on how to deploy a Horizon Cloud environment completed contained within Azure, without the requirement to connect to an on-premisses network using either a VPN or ExpressRoute links. In order to to achieve this scenario I had to deploy a Windows domain within my Azure subscription. In addition since there is not a on-premises network to connect to there was not a need to deploy internal UAGs, only external UAGs were required.

These were the items required for this integration

  • publicly registered Windows domain with DNS services where I could add DNS entries
  • A public CA issued certificate for your Horizon Cloud POD
  • An Azure AD Subscription
  • A Horizon Cloud tenant
  • An AD domain to bind your Horizon Cloud tenant to. In this lab I deployed my AD domain within my Azure subscription
  • A Vnet within your Azure subscription
  • A Resource Group within your Azure subscription
  • 3 Subnets required by Horizon Cloud (management, Desktop and DMZ networks) and 2 more subnets for the AD domain deployed within Azure.
  • External DNS entries for your Horizon Cloud POD
  • A NTP server, a public NTP server works.

Now that we know all the pre-reqs let's start with the process.

The first thing I created was my vNet and my 5 subnets in Azure. Make sure you select an IP Range for your subnet large enough to create your subnets without overlap.

You will need a Resource Group for the vNet to be part of. You can either create a new Resource Group during the vNet creation or create a Resource Group ahead of time and select it during the vNet creation


Once I had my vNet and subnets in place I created a Windows server VM in order to be my domain controller for my Active Directory domain. This domain is going to be bound to the Horizon Cloud Control Plane later on in the process. I placed the domain controller in my Default subnet. Once I created the VM I accessed it remotely in order to promote it to a domain controller.


Once the domain controller was set up I made sure to change my vNet DNS settings to point to my domain controller instead of Azure default servers. Without this change it would not be possible to bind the Horizon Control Plane to the AD domain.


At this point just to make sure things were going right I created a Windows 10 test VM in a subnet different from the subnet the domain controller uses and joined this new machine to the domain to ensure network connectivity between the subnets in the vNet exists. This is a troubleshooting procedure you can use in the future to troubleshoot network communication between your subnets.

After the DNS settings I made sure to register all the necessary resource providers required by Horizon Cloud. The list of required resource providers can be found here: Article

In order to do so I selected my subscription and then selected Resource Providers to see the list and register the ones required by Horizon Cloud. 


Next I created the App Registration required by Horizon Cloud. Copy and save the Application ID. You will need it later on in the process.


Once I registered the App I selected it and gave it a role assignment of contributor


After registering the App and giving it the necessary Contributor role I went back to App registrations and selected Certificates & Secrets in order to create a new Client Secret Key which is required by Horizon Cloud. Make sure you save the key value somewhere safe. Once you create the key Azure will no longer let you see the key value.


At this point my Azure settings were complete and I moved on to my Horizon Control Plane console in order to deploy Horizon Cloud into my Azure subscription. I needed the following information to Add my Azure subscription to Horizon Cloud:
  • Subscription ID
  • Directory ID
  • Application ID
  • Application Key
For the Subscription ID in Azure I selected my Subscription and then went into Overview


For the Directory ID I selected Azure Active Directory and then Overview. The Directory ID is called Tenant ID in Azure


I had already saved the Application ID and the Application Key in previous steps.

Now that I had the 4 necessary attributes I moved into the Horizon Cloud console. I received my Horizon Cloud tenant user id from VMware in an email titled "Welcome to the VMware Horizon Service"


After logging in I selected Settings \ Capacity and then clicked on New \ Microsoft Azure in order to deploy a Horizon Cloud POD into my Azure subscription


I then added the 4 attributes I collected from my Azure subscription in the first page

In the Pod Setup section I configured my POD name, location and NTP server


Lastly in the Gateway Settings page I enabled the external UAGs, provided the FQDN I had previously created in my external DNS for the POD and uploaded my public CA issued certificate for the POD FQDN


After 40 minutes or so my first Horizon Cloud POD was deployed using my Azure subscription. 

The last step on this integration was to bind my AD domain to my Horizon Cloud tenant. In order to do so I went in to settings \ Active Directory and clicked on Register to start the binding process


And that was it! I will soon post new articles illustrating how I deployed regular VDI App pools, Windows Multi Session (WVD) VDI pools and RDSH published Apps Pools on Horizon Cloud. I will also post and article on how I connected my Horizon Cloud POD to my Workspace One Access tenant. 

Happy testing! 

Friday, September 18, 2020

Windows 10 Out of the Box Enrollment (OOBE) with Workspace One UEM and Azure Autopilot

Today's post illustrates how I set up my Workspace One UEM and Azure sandboxes to provide Out of the Box Enrollment or OOBE to Windows 10 devices.

These are the components that I used for this integration

  • publicly registered Windows domain with DNS services where I could add DNS entries
  • A Workspace One Access (vIDM) SaaS tenant
  • A Workspace One UEM CN1506 SaaS tenant
  • An Azure AD Subscription 

Before starting this set up my Windows domain was already integrated with my Workspace One Access Tenant. This is a pre-requirement.


Let's start with the basics. In your Workspace One Access tenant make sure you have a Windows 10 device authentication policy


And in the Workspace One UEM console make sure your Intelligent Hub is set to be pushed to the devices after enrollment in Settings \ Devices & Users \ Windows \ Windows Desktop \ Intelligent Hub Application


Select which optional prompts you wish to show the user during enrollment in Settings \ Devices & Users \ General \ Enrollment


Now that we are done with both Workspace One UEM and Workspace One Access configurations you need to set up Autopilot in Azure. 


The first step is to add your Workspace One UEM tenant in Mobility (MDM and MAM). The way I set up my configuration was to add the Airwatch by VMware application and set its MDM user scope to None. My intent was to use it as an example. 


I then added a second App pointing to my Workspace One UEM tenant and set its scope to All. More information on which attributes to set in these steps can be found in this Techzone article: Article


Airwatch by VMware App

My customized MDM App


The next step is to click n the MDM application settings, go into API permissions and add specific permissions to your MDM application.

You are required to provide specific delegated permissions and application permissions

You need to click on Azure Active Directory Graph in order to be able to set the permissions

I set the following permissions for my lab:

Delegated Permissions:
  • Directory.AccessAsUser.All
  • Directory.Read.All
  • User.Read
Application Permissions:
  • Device.ReadWrite.All
  • Directory.ReadWrite.All

Once you selected the necessary permissions the last step is to grant consent


These were the steps required in the Azure Portal. Next you need to configure you Microsoft Business Store You can 
for example customize your store background page, a user-name hint, and Sign-in page text. Those attributes will be displayed to the user during the OOBE process. 


Now, within the Autopilot process you can work with PC vendors in order for them to add the new devices you purchase in your business store. In this set up since I had to work with Windows 10 devices I already had I ran a couple of powershell commands into my Windows 10 devices to create a CSV file. Then I imported the CSV files into my business store in order for these devices to be part of my OOBE process with Autopilot. You could do the same in order to test your Autopilot set up. These are the powershell commands I used:

  • Install-Script -Name Get-WindowsAutoPilotInfo
  • Get-WindowsAutoPilotInfo.ps1 -OutputFile C:\<directory>\<filename>.csv

Once you have the CSV files ready import them to your Microsoft Business Store


Now you can create your Autopilot profile, deciding which pages you want the user to see during the process (my stance on this is less is more) and assign the devices you imported using the CSV files to this new Autopilot profile


The final step is for your to bring your device to a fresh state 
with this command and test your OOBE with Autopilot 

 (***CAUTION***,All the data on the device will be lost!) 

  • C:\Windows\System32\Sysprep\sysprep.exe /oobe /shutdown

This should be your result. Happy testing!


EUC Lab Build

As a EUC professional I require a lab in order to stay current with new features, prepare for presentations, test new versions, help custome...